
We just released DPCalendar version 5.4 with some amazing new features. Or mission is to make one of the smartest Joomla event system out of DPCalendar. Beside the well know integration plugins to integrate your Google calendar, iCloud or Exchange events we are investing a large amount of time to make the booking and ticket system more convenient for you. Read on what we did on that part of DPCalendar and for more amazing new features.
The biggest change in the booking part is to set an end date where no more bookings are allowed. This date can be set in the event settings and can be an absolute or relative date to the start date of the event. Further changes are that the event limit is now globally per user or mail address. This means a person can not book on the second booking more tickets when the limit is already reached on the first booking.
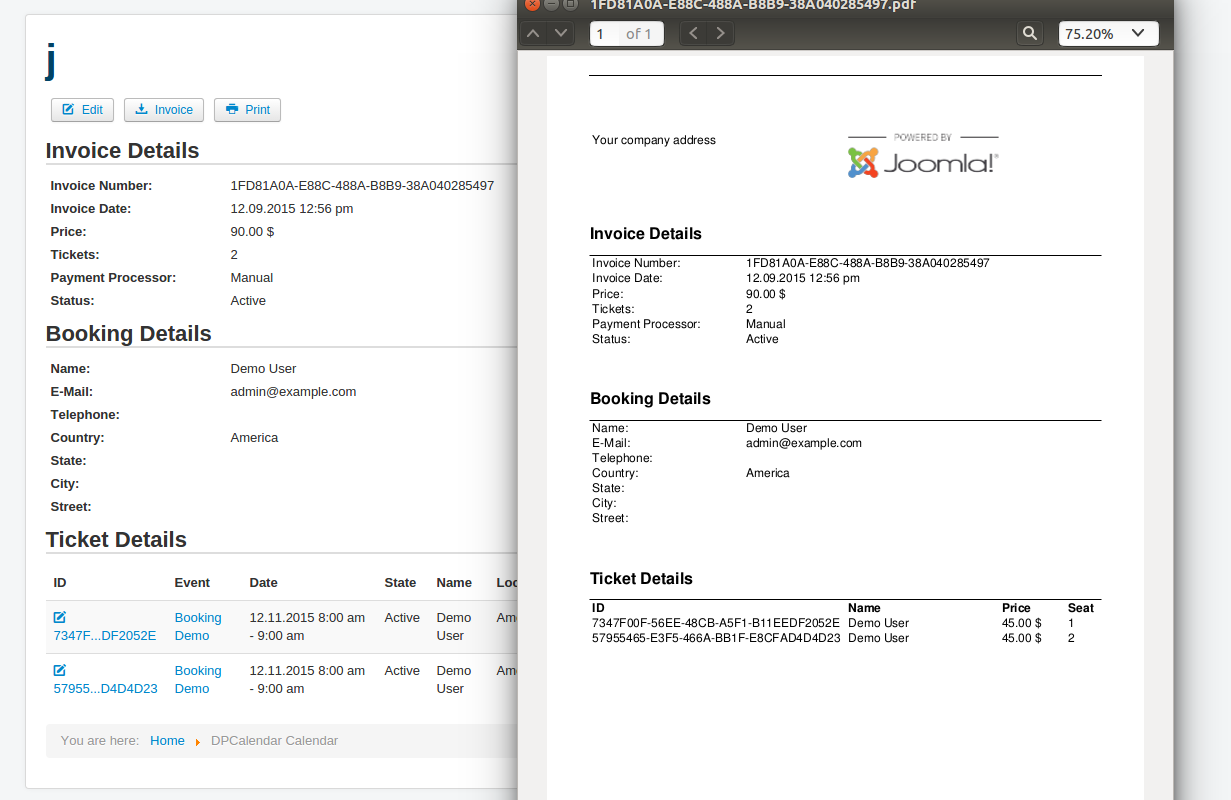
When the event changes, the ticket holders will get notified about the changes. It is also possible now to download the invoices and tickets in the back end. They can also be resent.

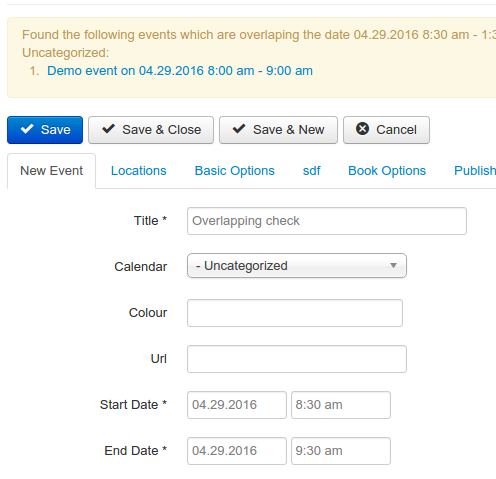
A check can be activated in the DPCalendar options when editing an event if it should be checked if there is already an event in that time frame. A warning will then be displayed above the input controls.
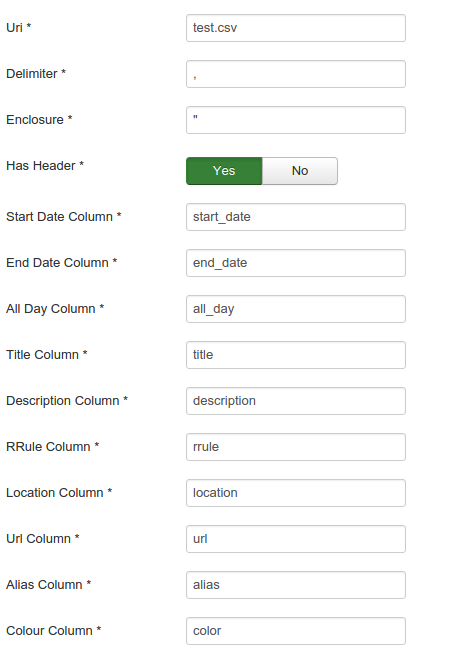
The CSV plugin got a bunch of new settings. Per CSV file the admin can define now which column represents the field of the event. Additionally the delimiter and the enclosure can be set.
Beside that we fixed tons of minor bugs and did some small enhancements for a new experience for the Joomla calendar and event manager. The following list represents the full changelog of the new 5.4 version:
Kind regards
Allon Moritz aka laoneo
Founder of Digital Peak

[UPDATE 31. October 2016]
Custom fields got merged into Core!! We are finalizing it. All open issues can be seen here and and pull requests here. You can expect it for version 3.7!!
For a long time the Joomla community has a demand for a simple but powerful custom fields feature in the core Joomla CMS. In the Joomla 2.5.x and 3.x series, the internal form library has evolved and it is now possible to build a custom fields extension around JForm and the internal plugin system of Joomla, which just works. That's why we created DPFields for our own extensions and the Joomla core extensions like the articles manager or the user manager. We soon realized that DPFields can perhaps fulfill the needs of a basic custom fields feature in Joomla. So we asked our fellow developers on the mailing list and got some positive feedback. After Allon joined the Joomla 4 architecture team, some discussions were held with the PLT members Chris Davenport and Marco Dings, if custom fields should come into Joomla 3.6 or waiting for Joomla 4. We all agreed that it would make sense to have it in the 3 series as well.
We will take the source code of DPFields 1.2.x and port it to the Joomla CMS. The name of of the custom fields extension will be com_fields and will integrate as a horizontal component. A horizontal component is new construct which will make the life of extension developers much easier in Joomla 4. But that's another story.
The component itself manages the fields for the different contexts. The fields system plugin will then hook into various events to add the custom fields to the edit forms or display them on the front. Every component in the Joomla core which can make use of custom fields will have some new menu items to manage the fields. It is a similar approach as with categories. For the beginning we will add custom fields to the articles and users.
To test out the custom fields feature for Joomla, install the patch from PR #11833 or download Joomla from the custom fields branch from our fork https://github.com/Digital-Peak/joomla-cms/tree/custom-fields.

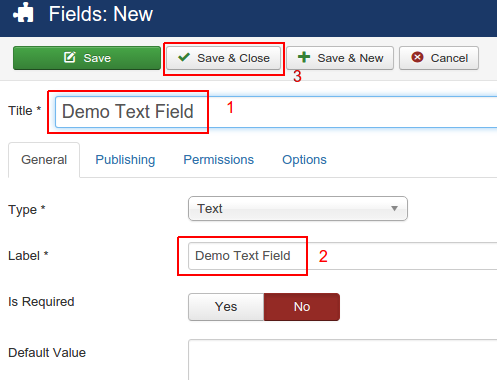
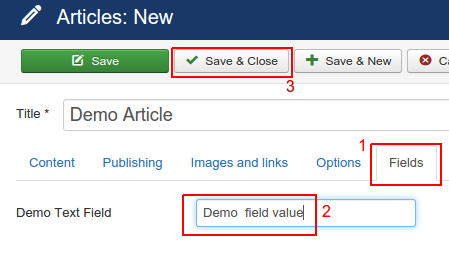
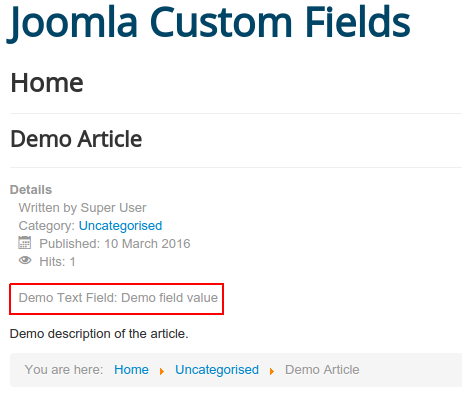
This short tutorial will show you how to create your first custom field for an article and display it on the front with a custom field.
After some internal testing and hopefully feedback from early-bird testers, we will create the pull request. That starts a next round of input from a wider range of Joomlers. If all goes well we hope it will be in Joomla on the J and Beyond conference. We will keep you updated on that blog how it goes.
The future of DPFields is unknown at that point, but you will always be safe as we provide a migration path. For the closer future you don't have to worry as we will keep DPFields alive and do active development of new features for it (if accepted, we will port it to core then). If com_fields will get the attention we hope within the Joomla community, then we will provide a migration path for all DPFields users and shut down the project. If not, we will keep the DPFields extension suite definitely alive. For you as user, nothing will change right now, and we will make sure you will have a neat experience, with com_fields or com_dpfields.
The development of the custom fields feature moved to it's won repository at https://github.com/joomla-projects/custom-fields.
As the Joomla PLT team decided to change the version number for the version 3.5.2 to 3.6.0, com_fields will be part of Joomla 3.7.
Custom fields PR #11833 has landed with over 100 issues closed, 50 pr's done and 200 commit. Please do further testing there and not on the custom fields project!
Custom fields PR #11833 got merged. We are finalizing it now.

This is a guest post blog from one of our DPCalendar users who wanted to integrate Airbnb into Joomla. It's a step by step tutorial how to connect these two systems using the iCal plugin available in the DPCalendar Standard version. With DPCalendar it is possible to present a single calendar view of a users holiday rental website with the popular Airbnb accommodation rental site, this article explains the steps involved in getting it up and running.
It is assumed at this point you have read and followed our instructions for getting started and have created your local calendar. It is also assumed you have a presence on the Airbnb website and have access to the user admin section. It is also worth understanding the different types of calendars is use, we will be using both a local native view and a subscribed view see here.
There are 2 steps involved in providing a single calendar view to both sites
After this step you will have a combined view of your DPCalendar calendar and Airbnb calendar within Joomla, which will refresh from Airbnb whenever a user loads your Joomla page. Lets assume we have setup our local DPCalendar and it has a title of "Local Calendar1" and we know how to create an event and for that event to be viewed on our site either by using a menu item or perhaps the mini module, what we now want to be able to do is to overlay that view with the content from the corresponding Airbnb calendar.
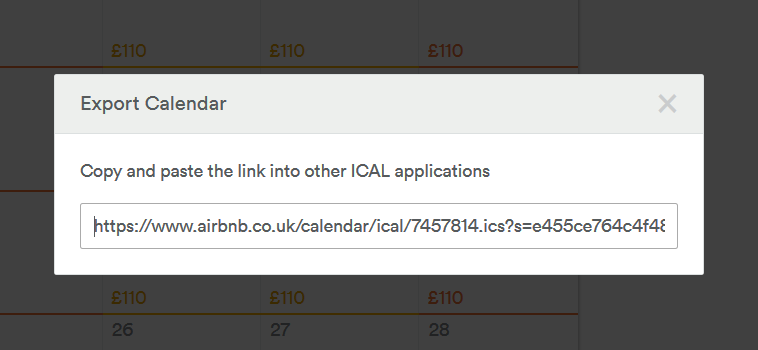
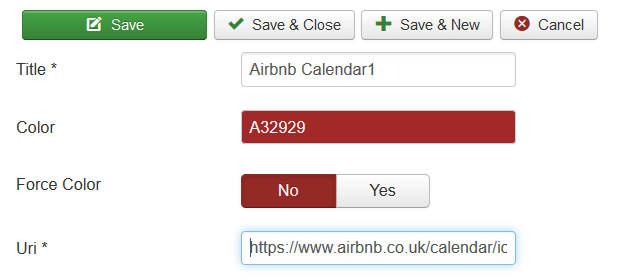
First we need to logon to our Airbnb admin area and take a copy of the Uri which we will need when we setup our Ical plugin.
You will then be provided with a Uri which you can now cut and paste into your Ical plugin settings.
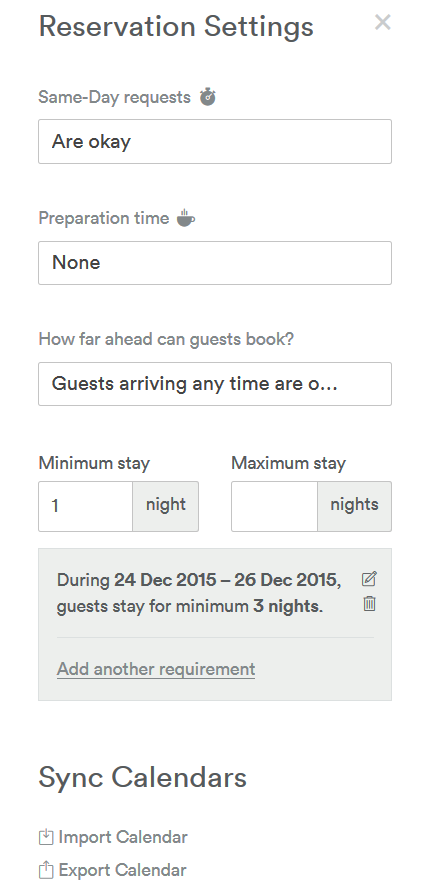
Now we can go back to out Joomla site and open up the DPCalendar Ical plugin and proceed as follows.
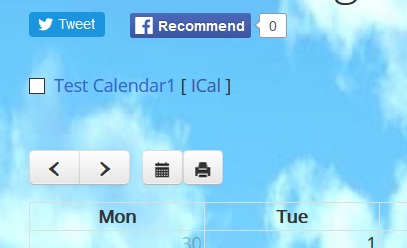
We now have a link setup from the Joomla site to the Airbnb site, now we can add the calendar feed to our local calendar. In this example I'm using the mini calendar module, but the same applies using the menu item calendar display.

At this stage we now have a single view on our Joomla site of our local calendar AND the Airbnb calendar, the view of the Airbnb calendar will be refreshed when a user loads the page on our Joomla site, we now want to reflect any changes made to the DPCalendar back to the Airbnb calendar to complete the integration.
The steps to be performed are essentially the same steps as above, but instead of exporting from Airbnb, we now want to import.
First we need to obtain our DPCalendar Uri for our local native calendar, there are 2 options to find this:-
Now that we have our Uri, we can logon to our Airbnb admin area and copy the Uri into the calendar import setting.
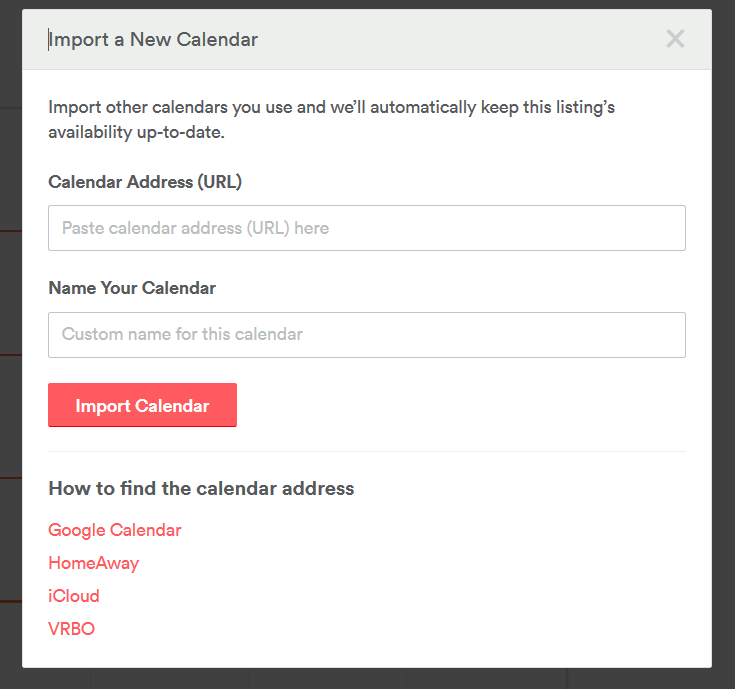
Simply paste your Uri into the Calendar Address (URL) field, give your Calendar a name e.g. DPCalendar1 and press the Import button, the Airbnb calendar will now synch with your Joomla site and continue to do so automatically every few hours.
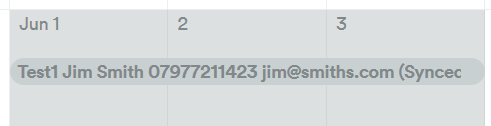
An entry exported from DPCalendar will appear on the Airbnb admin view as shown.
And on the front end guest view.
We now have a 2 way flow between our Joomla site and Airbnb, but there are some points worth remembering.
 The advent of Web applications has an interesting effect on the venerable 4Ps of the traditional marketing mix concept (Product, Price, Place, Promotion), in that the single website (or mobile app) can be all 4 things at once. The problem is, of course, that having a single item perform multiple roles simultaneously can be tricky to handle.
For instance, a Web application’s product offering is often itself the service (or the set of services) which a particular website is offering, and hence has to be fully functional. However, newcomers to the site may not necessarily understand all the dimensions of that service, and will need to be taught how to navigate the application’s features. At the same time, the website also has to attract its target market by showcasing all the benefits of the service(s) as compared to its competitors. And above all, users have to be encouraged to sign up for the service.
So how should this juggling act be resolved? One of the more common user design (UX) patterns in use out there is called gradual engagement. In essence, gradual engagement is designed to slowly (but immediately) immerse a prospective user into interacting with the web application, by guiding the user through using the application with plenty of tooltips and helpful hints, while delaying the sign-up until towards the end. The idea is, as the name suggests, to gradually engage the user with your product or service in such a way that when the sign-up page is reached, it is seen as an almost organic and natural part of using the service – and by doing so, lowering the prospective user’s barriers towards the process.
Gradual engagement as a UX pattern has been around since the mid-to-late 2000s, and has seen a great deal of success in many scenarios. It has also been viewed with concern, because it could be seen as a form of bait-and-switch tactic if implemented incorrectly. Here are some factors to consider whether or not your website can deploy a form of gradual engagement:
Your web or mobile application is far more likely to benefit from using gradual engagement if it focuses on delivering a single service (e.g. Twitter), or a small set of closely-related services (e.g. Windows Central), instead of being a portal to an umbrella of not-necessarily-similar features (e.g. Microsoft Live).
Gradual engagement works well when your prospective users can see immediate results from using your web application. This allows you to build rapport quickly with them and increases their engagement with the application. It does not matter whether the ultimate fulfilment of the application comes later (e.g. online shopping), as long as the process is seen to have immediate effects (e.g. items are added to a shopping cart, which can be edited without navigating away from the main shopping page).
The easier you make it for your prospective users to get started doing what they came to you to do, the easier it will be for them to continue onwards and stay engaged with your service. Providing helpful hints and tips on the salient features of your application as they progress through will help, as will an analysis on the application’s design itself.
Many mobile games that are free-to-play (especially endless runners) use the process of gradual engagement to encourage players to keep playing and bring them on board the gaming experience. Only later, once they’ve started to enjoy the game, are they introduced to the in-app purchases or sign-in features. Which other Web or mobile applications have you seen use gradual engagement?

One of the most requested feature for DPCalendar was a more enhanced ticketing workflow. In DPCalendar 5.3, we completely revamped the former attending functionality into a fully featured booking and ticketing workflow. Additionally we refactored the payment gateways to be based on Omnipay, which allows us to implement new payment gateways faster. With over 50 cases solved, working hundreds of hours on the next generation of DPCalendar, we are very proud to publish DPCalendar 5.3 to to the public! Read on about more information of the new features.
If the user books now an event, a whole process is started to trigger payment gateways and create tickets. More notifications E-Mails (eg. to the author) are sent out with important information embedded into the mail content, the ticket is attached as PDF and the event can be imported from the mail into the mail app of the attendee. Multiple tickets can be booked and the prices are reflected directly on the booking mask.
To get a quick overview about the status of the tickets of an event, the author or the admins have a direct link to the tickets, where they can see who has paid and who not. If the author wants to invite some registered users and invite button allows to send out invitations to individual users or whole user groups. The booking is getting the state invited and the user has the possibility to decline or accept the invitation.
The ticketing system is made the way that also none registered users can book seats for events. This means that the contact to the attendee is almost lost after the booking is made. To turn your attendees into followers of your site, we implemented the concept of gradual engagement. This means that after the booking is done, DPCalendar is offering to create an account on your site, to turn the visitor into a user immediately.
After the booking is done and the tickets got paid (if needed), the attendee is getting access to the tickets itself. The attendee can change the address on the ticket and the reminder time before the event happens. Below the details a QR code is displayed. Is the ticket printed out, the guard on the event can scan it and if logged into the web site, the ticket will be marked as checked in. This means if a second visitor is coming with the same ticket, the entrance is not allowed. Additionally a ticket is getting a seat number to easily identify the place the ticket belongs to.

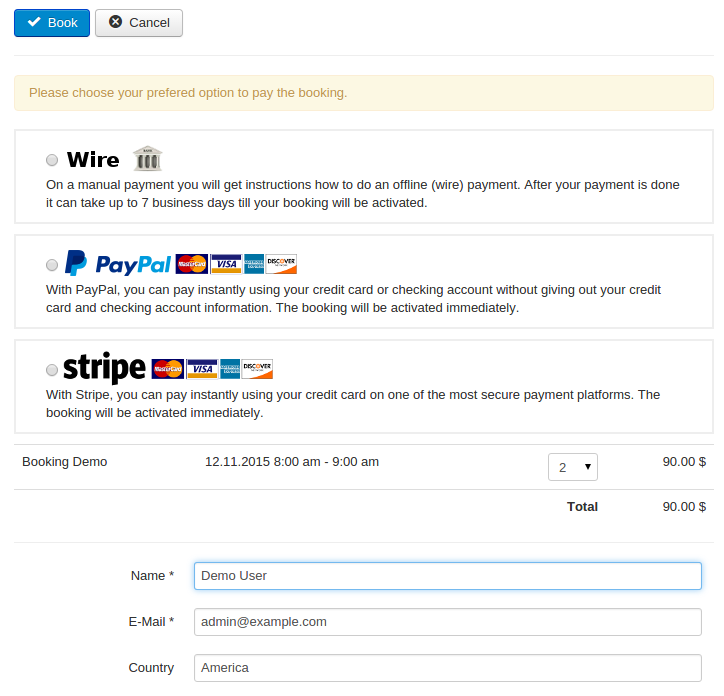
If an event has a price set, then the visitor needs to do a payment. Payments are implemented through Joomla plugins which can be configured in the Joomla plug in manager. We supported till now manual (wire) payments, Paypal or Stripe for credit card payments. Additionally we implemented 2checkout as new payment gateway. The visitor will be redirected directly to the 2checkout site for safe payments. After the payment is done an invoice is sent to the attendee. On the new booking menu item, the user can download later the invoices again as PDF file if needed.
This is only the beginning of a bigger change in the attending/booking feature of DPCalendar. In 2016 we have plans to introduce multiple prices per event, add more payment gateways and to introudce new views like a resource view. Stay tuned for more cool features to come!
Beside that we fixed tons of minor bugs and did some small enhancements for a new experience for the Joomla calendar and event manager. The following list represents the full changelog of the new 5.3 version:
Kind regards
Allon Moritz aka laoneo
Founder of Digital Peak