Menu

#709 Google calendar plugin

Parent Category:
DPCalendar
Category:
Calendar plugins
Last Updated:
Allon Moritz, Wednesday, 24 January 2024 12:04
Created:
Tuesday, 15 April 2014 08:50
Hits:
84164

This feature is part of the DPCalendar Professional subscription.
SubscribePHP 7.4PHP 8Joomla 3.10Joomla 4.4Joomla 5

Introduction

The Google calendar plugin integrates events from your Google calendars into Joomla through DPCalendar. It is a two way sync plugin, means that you can manage (create/edit/delete) the Google events from within your Joomla site.

The ONLY way to make your Google calendars accessible in DPCalendar is to import them, because the Google API requires a refresh token which is obtained through the import process. To be able to import the calendars you need to get first a client id and client secret string from the Google developer console.

To get a bigger picture how external calendars are handled inside DPCalendar read the article Integration/Import external calendars.

Client ID and Client Secret

To be able to import your Google calendars you need a client ID and client secret from the Google developer console. This credentials are used to make authenticated requests against the google API endpoint. It is OAuth authentication and allows you to revoke the credentials at any time without exposing your private username and password.

Create API project

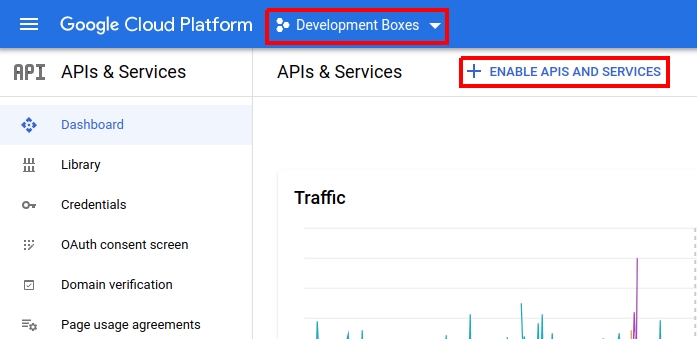
Select in the top bar a project, when you open the console the first time, Google creates an initial "API Project" for you automatically. Then click on the "Enable API's And Services" link.

Google create API project

Enable API

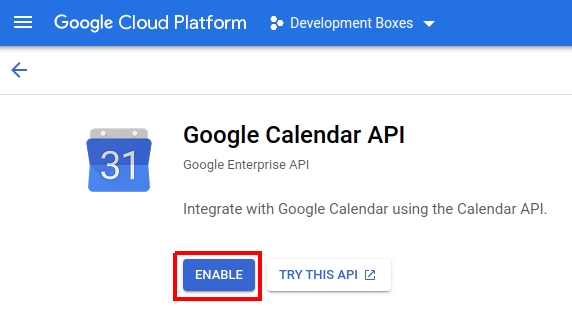
You will get redirected to the API search page. Search for calendar and click on the Google Calendar API result. Now a page comes up where you can activate by clicking on the "Enable" link.

Google enable API

Check the enabled API list

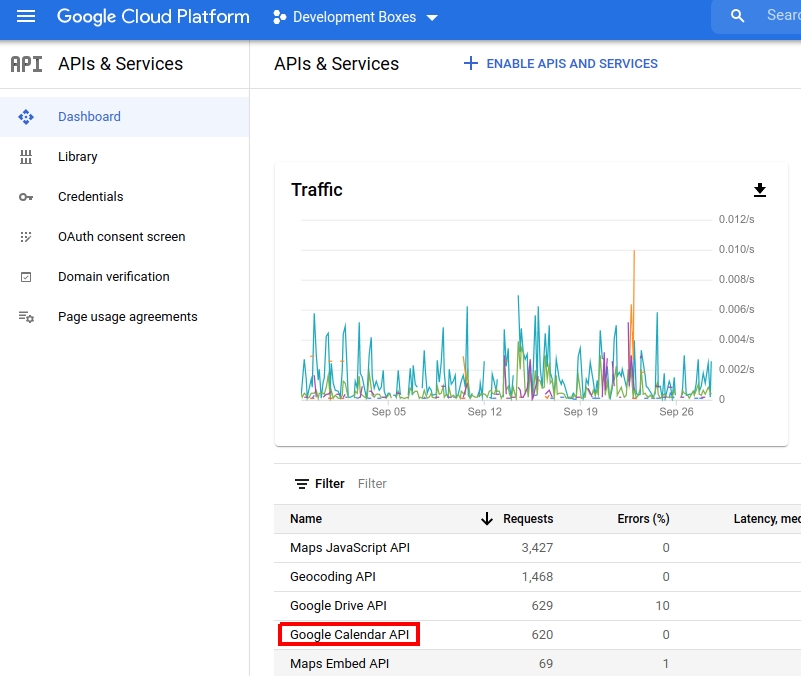
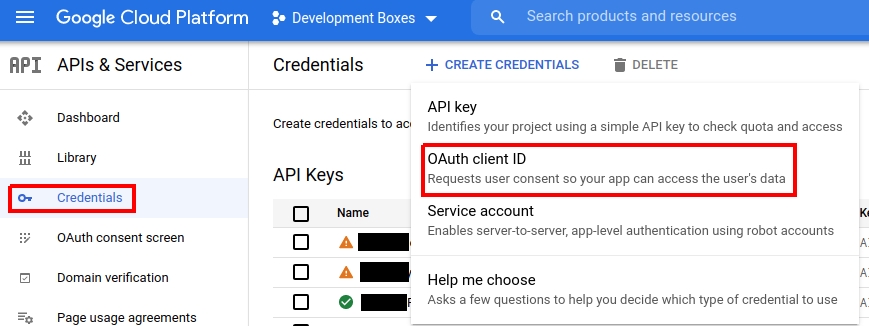
If you click again on APIs, then you should see in the Enabled APIs tab the Calendar API. In the left toolbar click now on Credentials.

Google API list

Configure the OAuth consent screen

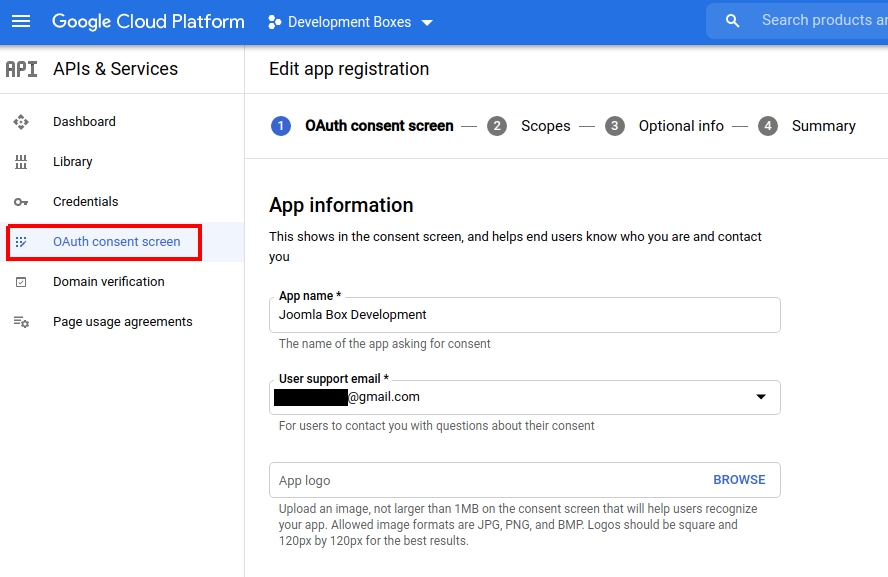
The consent screen represents the page when you import the calendars later. Go through the wizard and define the required fields. After you have finished to setup the consent screen, go back to the page and verify that the "Publishing status" is set to production. Otherwise your API keys will expire after 7 days.

Google API consent screen

Create credentials

Click on the credentials tab. Click now on the Create credentials button and then on the OAuth client ID list item. Now you are going to create the actual credentials which will be used then later for the import.

Google API credentials

Create client ID and secret

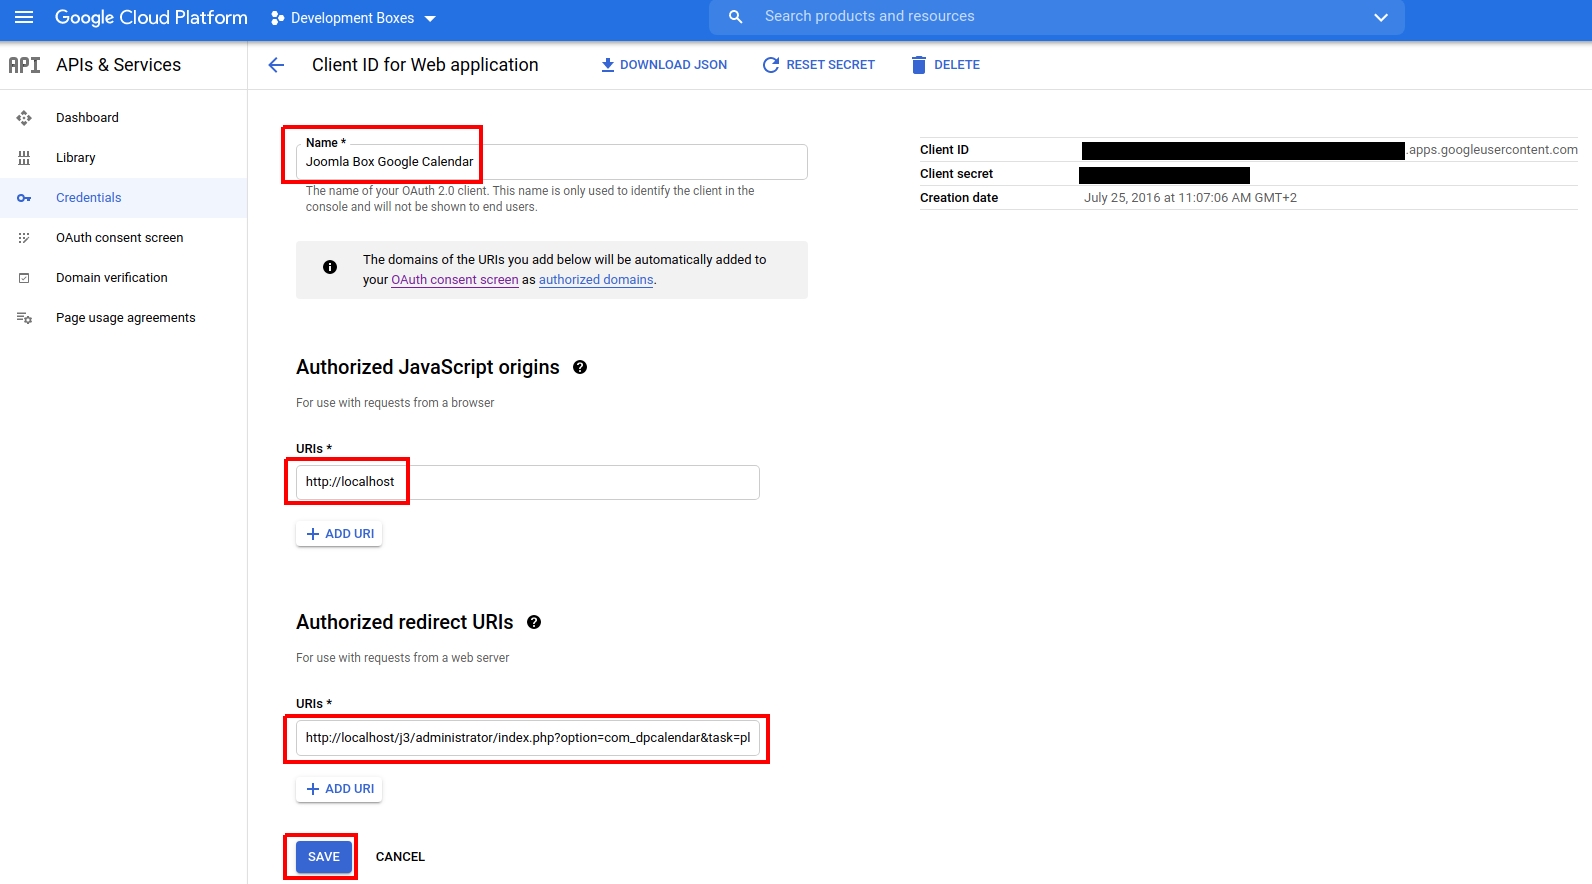
You have to select Web application and put into the "Authorized Javascript origins" your web site url. You have to make sure to set url correctly without any path, and it must start with https. In the "Authorized redirect URIs" field you have to put an url with the following parameters:

https://www.example.com/administrator/index.php?option=com_dpcalendar&task=plugin.action&plugin=google&action=import

Replace example.com with your web site url. This url is important, if it is wrong you can't import your calendars, you will get a redirect_uri_mismatch error! Yo need also to use HTTPS as scheme as HTTP is not supported.

Google API client settings

Import the Google Calendars

  1. Click on the import button in the plugin edit form.
  2. Copy paste the Client ID and Client Secret from the google developer console to the form. Make sure you are logged in with the Google account you want to import the calendars, otherwise you will get an error like "Could not json decode the token"!
  3. Click the "Import" button.
  4. Accept the permission questions from Google. If you get a message, that the app isn't verified, then click on the "Show advanced" link and then on the "Go to sitename" link. It will forward you to the permissions page.
  5. The Google calendars should be imported into the DPCalendar Google plugin.
Google API client settings

Attachments

The Google calendar API does support attachments. But only if they are stored on Google Drive. The attachments are rendered in a separate layout in the file /plugins/dpcalendar/google/tmpl/attachments.php. If you want to change that, then you need to copy it to /templates/{your template}/html/plg_dpcalendar_google/attachments.php and change it to your needs. The attachments are automatically downloaded to a local cache folder (/cache/plg_dpcalendar_google/attachments) and when they are images, then they are added to the event image attributes. Like that are the attachments served locally from the Joomla web browser and do improve your sites privacy.

Troubleshooting

  • Error: The request is missing a valid API key
    This happens when the "Publishing status" in the "OAuth consent screen" is on testing and the calendar import was done 7 days ago.
  • 400 Error: redirect_uri_mismatch
    This happens when the Authorized JavaScript origins or Authorized redirect URIs values are incorrect and do not match your web site. Keep in mind also the protocol (http/s) and the port do need to be correct.
  • Times are not correct
    When the times of the Google events are incorrectly displayed, then the cause is mostly that the Joomla timezone is not the same as on your Google calendar. Double check that both timezones are the same.
  • Error too many characters in description
    When editing an event, Google does only allow up to 8912 characters as description.
  • Import with an IP
    When you want to import your Google calendars on a server with an IP address, this happens mostly when you are testing it on a dev server, then things get a bit complicated. This due the fact that Google accepts only uris as restriction parameters. What DPCalendar does when you are working on a IP address it uses localhost. So you have to use localhost in your restrictions uris instead of your IP. After the authentication in the import process you get then redirected back to localhost. In your browser replace then localhost with the IP address of your server in the url bar and the calendars should then import form Google.
  • 403 Error with forbidden screen on import
    A firewall rule is interfering here. If you have a security extension installed like Admin Tools check their settings. If your hoster has a web firewall active, contact them and check if they can add a rule to allow these requests. In mod security, there is a rule with the number 336141 which should be disabled.
  • 403 Error on your Joomla site
    Too strict .htaccess rules can also prevent the callback from being processed on your Joomla site after the grant.
  • Admin Tools error on import
    Admin tools assumes the one time calendar import is a malicious attack, even it is not. To make the import work, disable the "Protect against common file injection attacks" rule in the "Basic Security Settings". This has to be done only once when importing the calendars and should be enabled again when the import is finished.

DPCalendar Options

These settings are the same for every calendar configured in the plugin.

Calendar ID [Type: Text]
Usually an email address like demo@gmail.com.
Refresh token [Type: Text]
The refresh token is used to authenticate against Google.
Client ID [Type: Text]
The client ID from the Google developer console to authenticate. Please check the documentation for more information.
Client Secret [Type: Text]
The client secret Google developer console to authenticate. Please check the documentation for more information.
Format Description [Type: Radio] [Default: Yes]
Should the description of the events be formated or should it be left as it is (should be disabled when you have plain HTML descriptions).
The following options are available:
  1. Yes
  2. No

Plugin Options

Caching [Type: List] [Default: Joomla]
Select whether to cache the calendar data.
The following options are available:
  1. Joomla
  2. Database
  3. Never
Cache Time [Type: Text] [Default: 900]
The time for the cache in sec.
Sync Start [Type: Text] [Default: -3 year]
The relative start date to sync from.
Sync End [Type: Text] [Default: +3 year]
The relative end date to sync from.
Sync Steps [Type: Text] [Default: 1 year]
The sync steps.

Comments (0)

We use cookies on our website. Some of them are essential for the operation of the site, while others help us to improve this site and the user experience (tracking cookies). You can decide for yourself whether you want to allow cookies or not. Please note that if you reject them, you may not be able to use all the functionalities of the site.